How to design and print your own merch with SlapMake
A complete guide to the SlapMake studio: generate artwork with AI, edit it in a layered 2D editor, check it is print-ready, put it on a shirt, mug or poster, and order it.
On this page
- What SlapMake is
- Start without an account
- Make the canvas for your product
- Generate artwork with AI
- Remix an image you have
- Change one part only
- Edit it like a design tool
- Your library
- Check it is print-ready
- Put it on a product
- Order it and follow it
- How credits work
- It works on a phone
- Habits for better prints
- Questions people ask
Most custom merch starts the same way: an idea in your head, three different apps open, and a file that turns out too small to print. SlapMake puts the whole path in one browser tab. You make the artwork, fix it up, see it on a real product and order it, without exporting anything in between.
This guide walks through that path from a blank canvas to a finished order, and explains what each part of the studio is for. It is written for people who have never used a design tool, but there is enough detail here for anyone who wants to know exactly what the studio can do.
What SlapMake is
SlapMake is a print-on-demand studio with three parts that share one canvas:
- An AI image generator. Describe what you want and pick a model. You can also start from a picture of your own and have the AI restyle it, or repaint only the part you mark.
- A layered 2D editor. Text, stickers, a brush, photo adjustments, background removal and an undo history, all working on layers you can move, resize and reorder.
- A print shop. Put the finished design on a t-shirt, hoodie, poster, mug, hat, tote bag and more, check how it sits on the product, and order it.
Because the three parts share the canvas, the image you generate is already a layer you can edit, and the design you edit is already the file that gets printed.
Start without an account
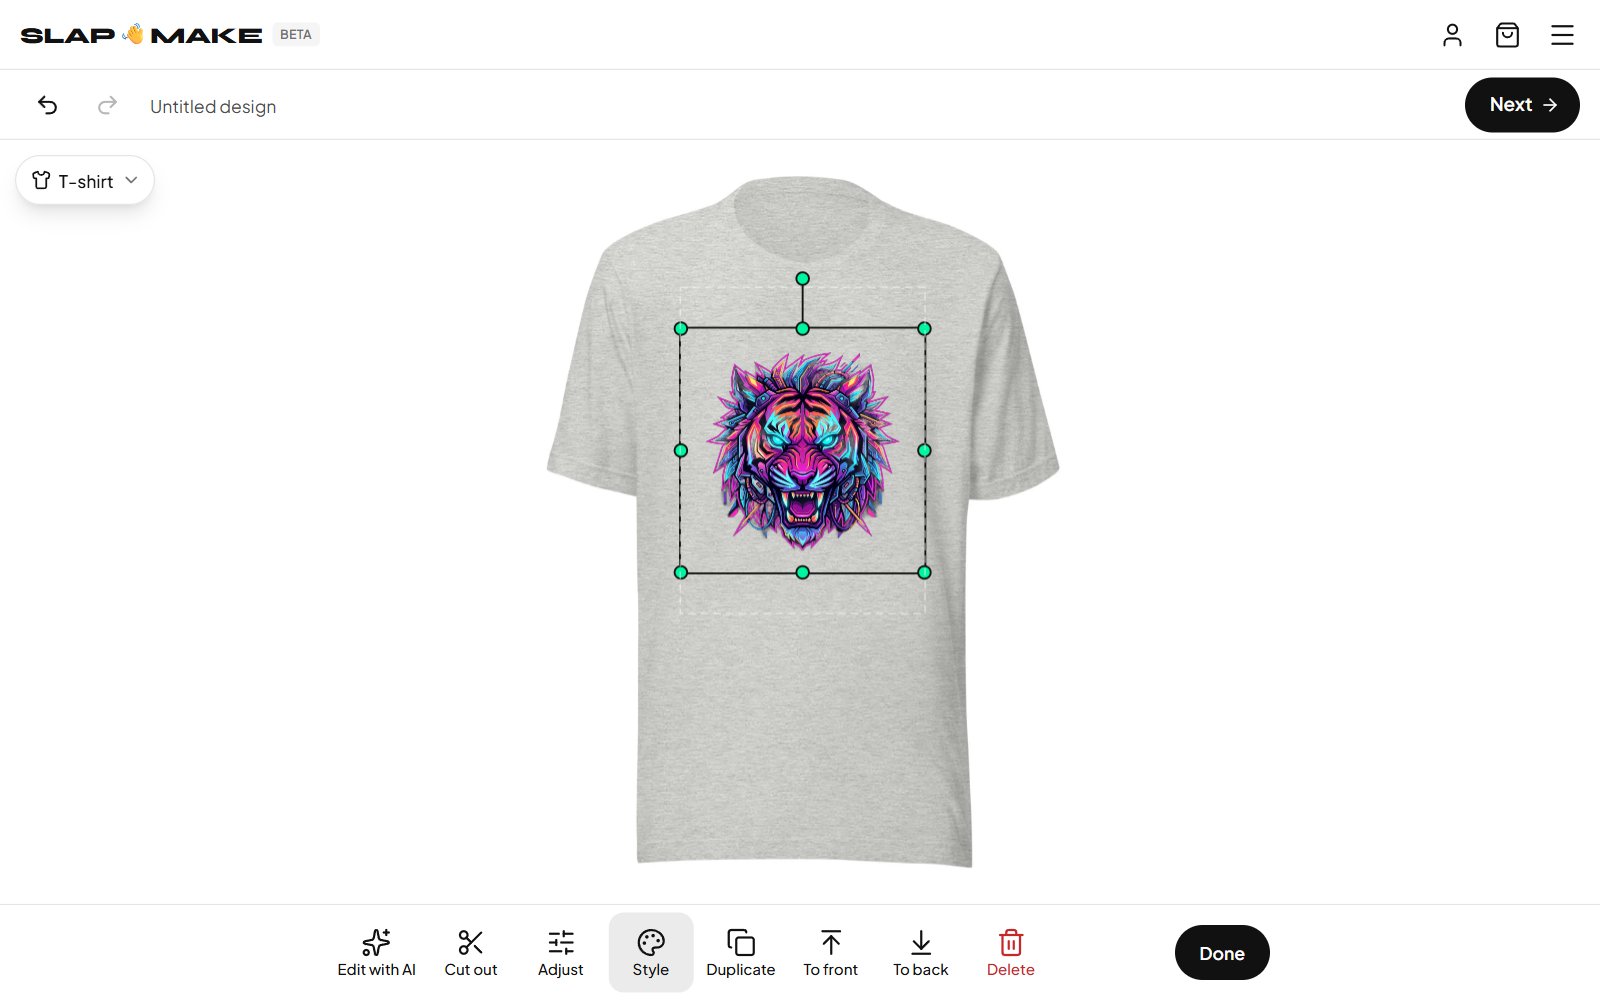
Open the studio and you land on a canvas straight away, shown on a t-shirt. You can add text and stickers, upload your own images, arrange layers and try every editing tool without signing in. Work you do signed out is saved in your browser.
You are asked to sign in at the moment you need an account: when you generate with AI, download a file or place an order. Signing in takes an email and password (with a confirmation code sent to your inbox) or one click with Google. Whatever you made before signing in is uploaded to your account, so nothing is lost by starting first and deciding later.
The studio is laid out like a phone photo editor. Five big buttons sit along the bottom: Create, Upload, Text, Stickers and More. Each one opens a sheet over the canvas (on a wide screen, a panel on the right). Undo, redo and Next are at the top.
Make the canvas for your product
The button in the top-left corner of the canvas says what the canvas is made for. It starts on the T-shirt; tap it to open Product & size and choose the product you have in mind, by its picture, the same way the shop shows them. The canvas takes the exact shape of that product's print area, at a resolution that prints sharp, and the real product shows around it, in the color you pick. Small print areas, like a hat front, are zoomed in so they fill the screen.
For a design that is not for one product yet, choose Square, or Custom size to type a width and height in pixels. You can change your mind at any time: the artwork is scaled to the new shape.
Generate artwork with AI
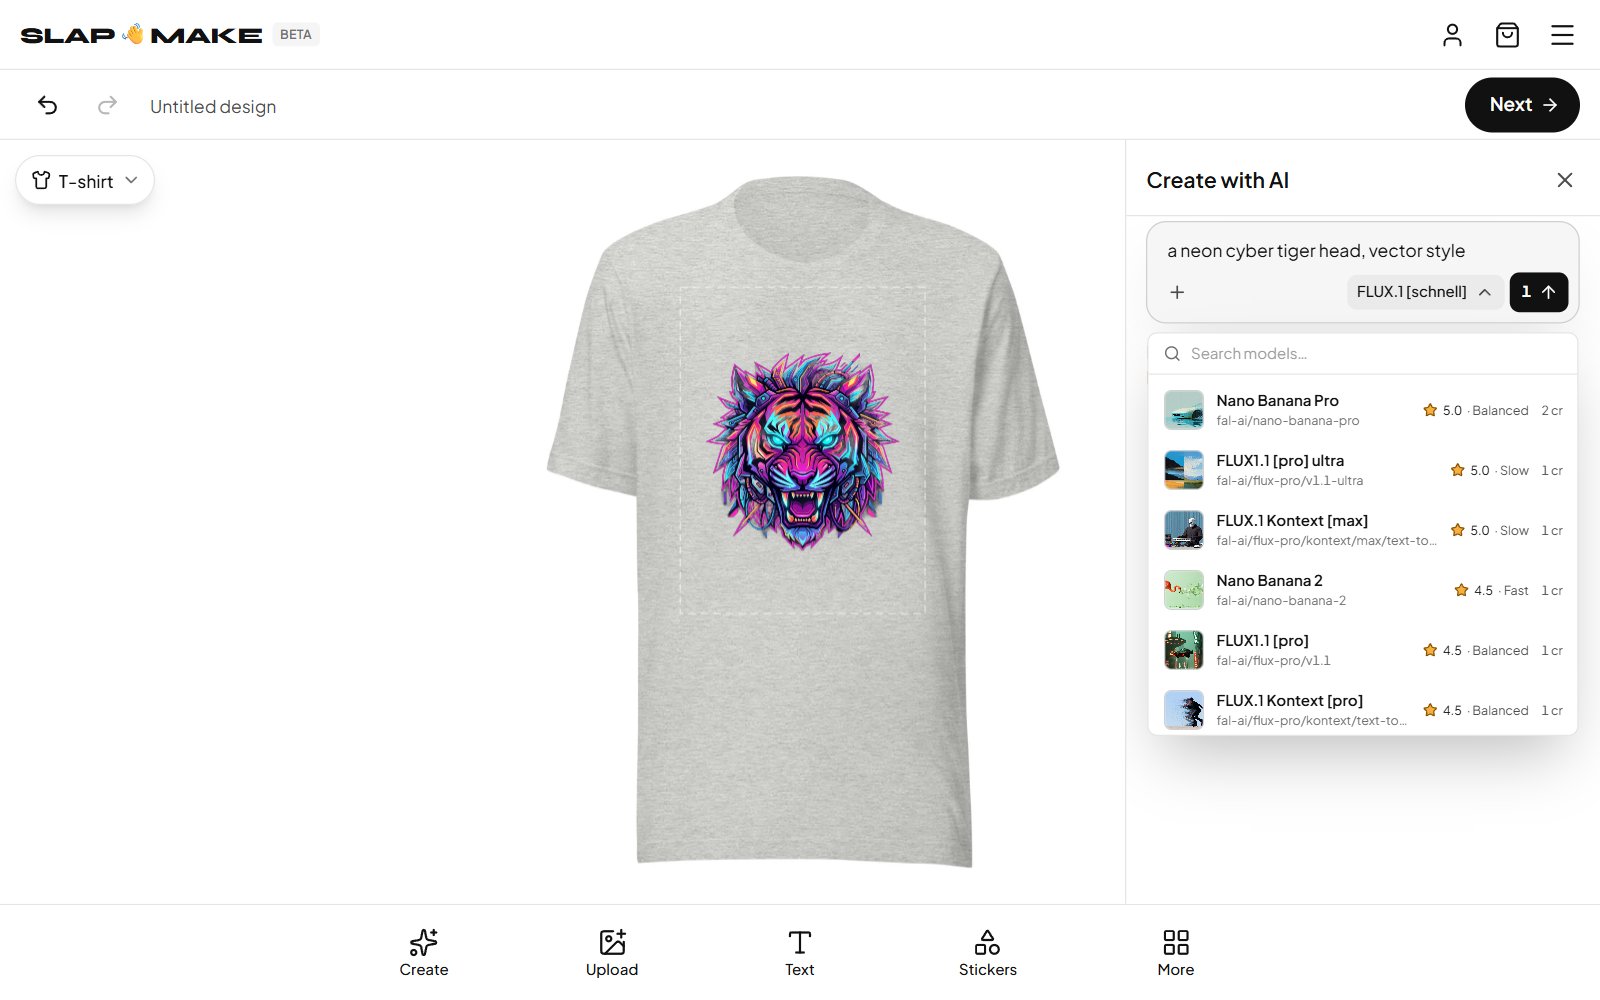
Create opens the one place you ask the AI for anything. Type a description and press the button with the price on it; the result arrives on the canvas as a new layer.
Picking a model
The model name under the description opens a searchable list of image models. Each one shows a quality rating, a speed label (Fast, Balanced or Slow) and what one image costs in credits, so you can see the trade-off before you choose. A fast, cheap model is a good way to explore ideas; switch to a higher-rated one when you know what you want.
Getting a better result from the same prompt
The plus button next to the description holds the options that change what comes back:
- Style presets such as Cyberpunk Vector, Anime Streetwear, Retro Synthwave 80s, Minimalist Emblem, Ukiyo-e Woodblock and Y2K Tribal Decal steer the look without you having to describe it.
- Enhance prompt rewrites a short idea into a fuller description. It costs a small fraction of what an image costs and is worth using when a result feels generic.
- Shape sets the proportions of the image. Left on Match canvas, it picks the closest fit to your canvas.
- Avoid lists what you do not want, for example blurry, watermark or text.
Remix an image you already have
Tap a picture on the canvas and choose Edit with AI, or attach a reference with the plus button (upload one, pick one from your library, or use the whole canvas), and Create switches to Remix. A small menu on the reference decides what the AI takes from it:
- Style: make something new that looks like the reference.
- Pose: keep the stance or composition and change the subject.
- Colors: reuse the palette.
- Edit it: change the reference itself. A Variation slider sets how far the result may drift from the original.
This is the quickest way to turn a photo into a graphic, or to get five versions of a logo idea that all belong together.
Change one part and leave the rest alone
Generated images are rarely perfect everywhere. Instead of starting again, open More and mark the part you want changed with the Marquee (a rectangle), the Lasso (a freehand outline) or the Magic wand (an area of one color), then choose Fill with AI and describe what should be there. Only the marked region is repainted, blended into what surrounds it. Two sliders in the bottom bar control the edge: how softly the new part fades in, and how far it reaches past your outline.
The same marked region has a second use. Press Delete with a layer selected and the region is cut out of that layer, which is a fast way to trim an image to a shape.
Edit it like a design tool
Everything on the canvas is a layer. Drag a layer to move it, and use its handles to resize and rotate it; it snaps to the center of the canvas as you drag. Tap a layer and the bottom bar shows what can be done to it:
- Edit with AI to change it with a prompt, and Cut out to remove a picture's background.
- Edit text and Style for the words, font, size and color of a text layer, or the fill and outline of a shape.
- Adjust for the light, color and detail of a picture.
- Duplicate, To front, To back and Delete. Done puts the layer down.
Text in the bottom bar adds a text layer, and Stickers has ready-made shapes, stars, arrows, badges and speech bubbles in the color you choose. More holds everything else:
- Layers to reorder, hide, lock, rename and blend layers, and History to step back to any earlier point, not just the last one.
- My pictures for everything in your library, ready to drop onto the canvas.
- The pro tools: Brush, Eraser, Shape, Line, Pen, Fill, Gradient, Crop, Repeat pattern, the Eyedropper and the region tools. A pro tool shows its options in the bottom bar, and Done goes back to the main tools.
Removing a background
Tap a picture and choose Cut out. The cut-out runs on your own device rather than on a server, so the image is not uploaded for it and it does not cost credits. The first time, your browser downloads the model it needs (about 88 MB), and after that it is quick. A subject on a transparent background is what makes a design look printed onto a shirt instead of stuck on as a rectangle.
Your library keeps everything
Designs save on their own as you work. My designs, in the menu and under More, lists every design you have made and every image you have uploaded, generated, edited or exported, with search and sorting. Any image there can be placed on the current canvas or sent straight to printing with Print on merch. The Showcase has ready-made graphics to open in the editor if you would rather start from something than from nothing.
Check that it is ready to print
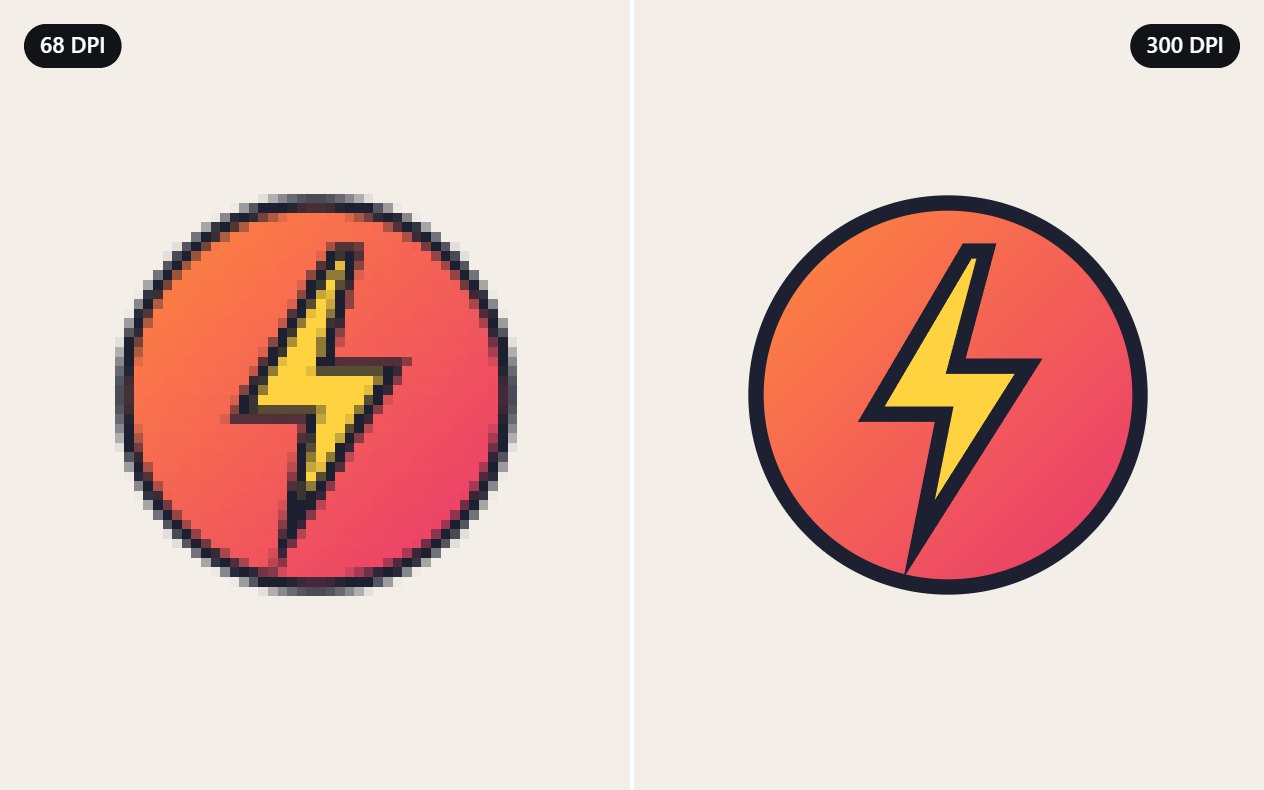
A canvas made for a product is already the right size: it matches the product's print area at a resolution that prints sharp. On a plain canvas, divide its size in pixels by 300 to get the printed size in inches. That number is the honest answer to "will this look sharp?": a 4500 × 5400 pixel canvas prints at 15 × 18 inches, while a 1080 × 1080 one prints at 3.6 inches across. Either way, the order screen checks it for you and says when a design would print soft.
If you only want the file, Download under More exports all visible layers as one image at full resolution. Downloads are free. Choose PNG for a transparent background (the right choice for printing), JPG for a small file on a white background, or WebP for the smallest transparent file.
Pre-print file checklist
Four free checks, a minute each, catch most prints that disappoint:
- Enough pixels. The print size calculator shows how large the file prints sharp, and how many pixels each product needs.
- A clean background. The transparent PNG checker finds faint leftovers that a dark shirt would print as a haze.
- No box around the design. If the background is still there, cut it out with the background remover.
- Too small? Make it two or four times bigger with the image upscaler, then check the size again.
Bright neon colors are a fifth thing to look at: the print color checker shows which ones ink cannot reach.
Put it on a product
Press Next. If the canvas is made for a product, it opens straight on that product; otherwise you see your design on every product at once, grouped like the shop: t-shirt, hoodie, matte poster, stickers, mug, dad hat, trucker hat, tote bag, phone case, backpack and more; all products are listed in the shop. Tap one to order it. Products whose picture is a print guide, like a mug's wrap, show a small photo of the real item beside it.
- 1Place the designDrag it into position, and use the Size and Rotate sliders. Anything outside the dashed line is not printed. Whole picture and Fill the area do the common placements in one tap.
- 2Choose color and sizePick the product color and, for clothing, the size. The preview updates so you can judge contrast: a dark design disappears on a black shirt.
- 3See a real photo of itAsk for a photo of the real item with your design on it before you commit.
- 4Buy now, or add to bagBuy now goes straight to checkout with just this item. Add to bag keeps it there while you design more. The price, in dollars, is on the button.
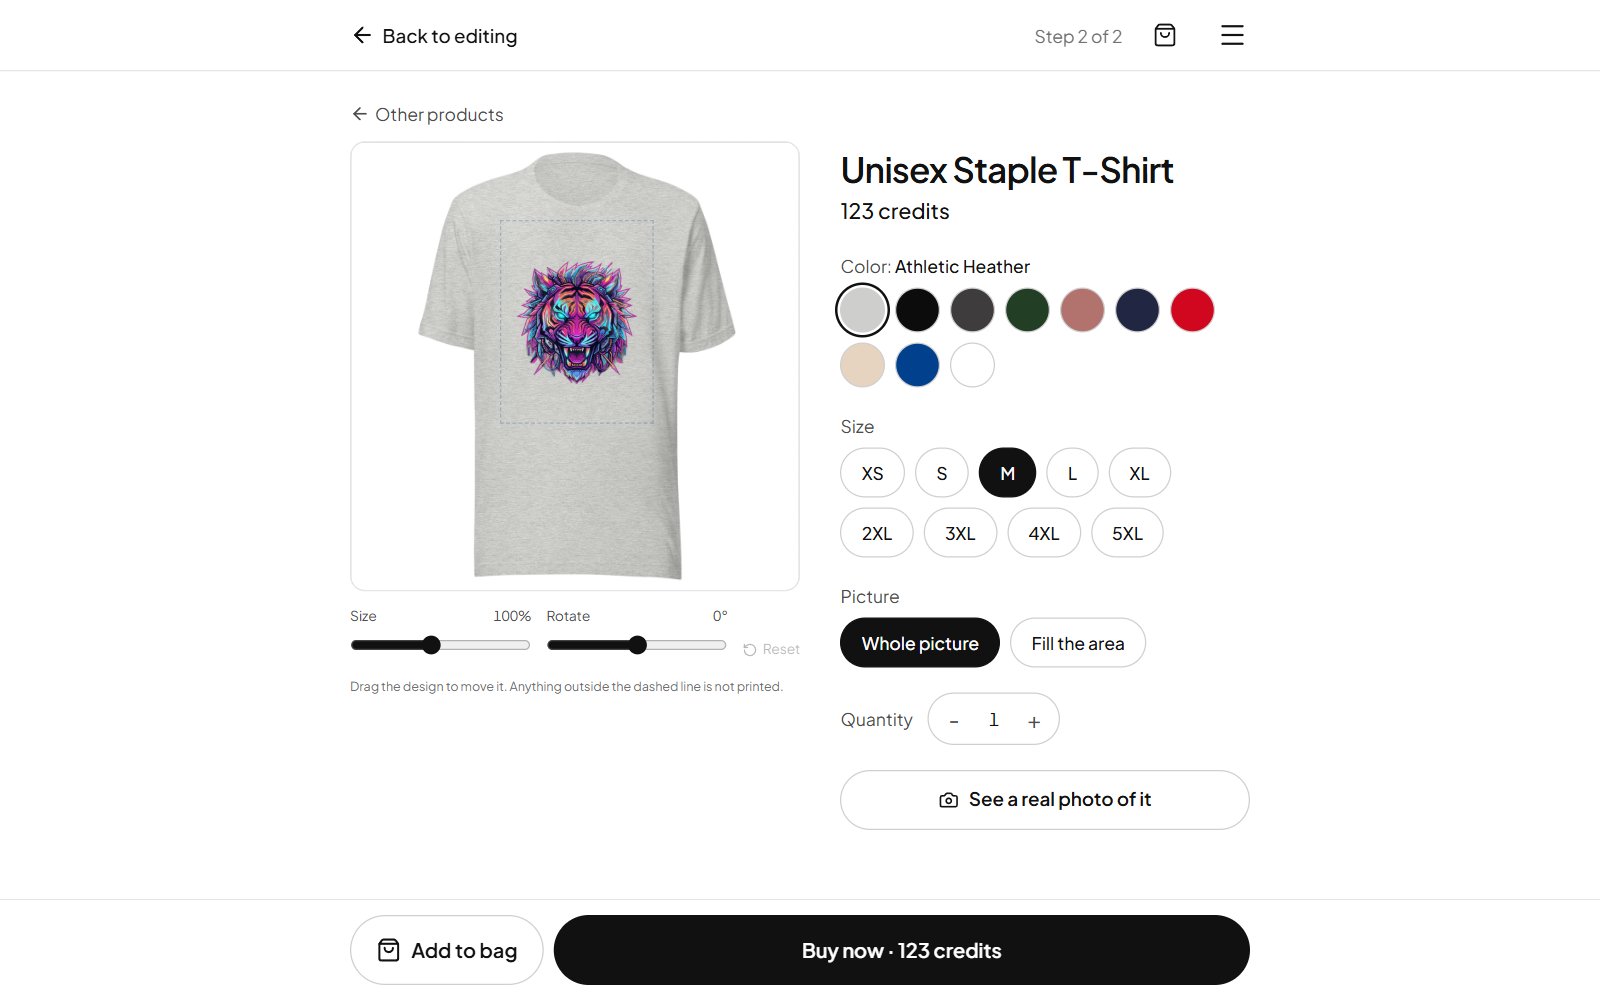
Back to editing returns to the canvas exactly as you left it, and if you chose another product or color there, the canvas follows.
Order it and follow it
Checkout has three short steps. You enter the delivery address, choose from the shipping options our print partner offers for that address, and review the total. Products and shipping are priced in US dollars, and the total is in view from the first step.
The last step shows the total for your address, with any taxes and fees, and you pay it by card right there. Once the payment goes through, the print-ready file goes to our print partner, who prints and ships the item.
My orders shows where each order stands, from received, through printing, to shipped, with the tracking number once the carrier has the parcel.
How credits work
Credits pay for AI actions: generating an image, remixing one, filling a region, enhancing a prompt. Products are not paid in credits: they are priced in dollars and paid by card at checkout.
The price of an AI action is shown on its button before you press it, and it depends on the model you picked. If a model fails to return an image, you are not charged. Product prices are shown in dollars on the order screen and at checkout.
Everything else is free: the editor, text and stickers, photo adjustments, background removal, your library and downloads. New accounts start with free credits, your balance is always in the menu, and the pricing page lists the credit packs, what credits buy and what products cost.
It works on a phone
The studio is built to be used on a phone, not just looked at on one. The canvas fills the screen, the main tools are big buttons under your thumb, two fingers pinch to zoom and drag to move around, and every sheet sits above the keyboard while you type. Generating an image on the bus and ordering the shirt before your stop is a realistic way to use it.
Six habits that make prints look better
- Start on the product. Make the canvas for what you are printing on before you generate anything.
- Remove the background. A cut-out subject sits on fabric far better than a rectangle.
- Mind the contrast. Check the design against the actual product color you will order.
- Keep text large. Small lettering that reads fine on screen can blur into the weave of a shirt.
- Stay inside the dashed line. Leave a little room around the edge of the print area.
- Look at a real photo. It takes seconds and catches most placement mistakes.
That is the whole path. The fastest way to understand it is to try it: open the studio, tap Create, type the first idea that comes to mind, and see how far one prompt gets you.
Questions people ask
Do I need an account to use SlapMake?
No. You can open the studio and design without one. You are asked to sign in when you generate with AI, download a file or place an order, and what you made before signing in is kept.
Is SlapMake free?
The editor, background removal, your library and downloads are free. AI actions (generating, remixing, filling a region and enhancing a prompt) are paid for in credits, and new accounts start with free credits. Products you order are priced in dollars and paid by card.
Can I use my own images instead of AI?
Yes. Upload photos or graphics, edit them with the same tools, and print them. AI is optional at every step.
What file do I get when I download a design?
One image of all visible layers at the full resolution of your canvas, as a PNG with a transparent background, a JPG on white, or a WebP.
How do I know my design is big enough to print?
Make the canvas for the product you are printing on and it is the right size from the beginning. The order screen also checks every design and says when it would print soft.
Does it work on a phone?
Yes. The studio is built for small screens, with big buttons for the main tools, pinch to zoom, two-finger panning and sheets that stay above the keyboard.